This is a perfect little bag to keep your makeup in.
Again I used my new material, it is so versatile.
Just a little lace and tassel will do.
Here I used a little more cotton lace.
I hope you can follow the step by step.
I think you could make it a bit bigger, maybe
one centimeter all around.
You need pretty material for the outside
and cotton lined wading for the inside.
Here I used a zipper that is way too long,
I use these on my baby pouches.
I do like to use longer zippers in my work
so my needle doesn't break when it hits the zipper's metal end.
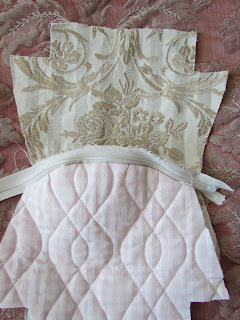
The first step is to zig-zag the zipper on one side of the bag.
I marked where I should start and end on both sides
of the zipper.
Then stitch the other side.
Now straight stitch the wading to the other side
of the zipper, pin where the material starts and ends.
You can see the step a bit better in these pictures.
Repeat this with the other side.
Now the zipper's ends are hidden between two layers
of material.
At this stage I decorated the front.
If I did it before, I wouldn't be able to get it
exactly in the middle.
I pinned all the parts together and stitched them
leaving the corners and an opening for turning
the bag inside out.
I left a ten centimeter opening free
on the side where you can see the ruler
and cut the excess zipper ends.
Here I stitched all four corners closed.
I turned the bag inside out and ironed all the sides,
and closed the opening on the bottom by hand.
I am afraid you'll see a lot more projects
made until I'm cured of this 'new material'...
I hope you have a lovely week.
xoxo
Today I'll be joining in with
and


Wow! That is a gorgeous bag!
ReplyDeleteThanks for letting me know about adding photo storage. I'm a photo-holic. It's worth the money I suppose.
Hi Angela,
ReplyDeleteThanks for sharing the tutorial for the sweet bag, love the fabric and embellishments.
Happy weekend
Hugs
Carolyn
wat prachtig is dit makeup tasje Angela.
ReplyDeletezo verfijnd en sjeik.
hartelijk bedankt voor de tutorial.
heb je een fijne tijd in nederland gehad?
Oh my gosh...fabulous tutorial girly! Absolutely LOVE this idea!
ReplyDeletexoRebecca
Wonderful bag and instructions!
ReplyDeleteYour blog is fantastic and tank you for tris beautiful tutori al
ReplyDeleteGiulia
I just found your blog through a pin on Pinterest. Wow! Such beautiful things here. I love all things vintage. Thanks for sharing your talent and tutorials, and lovely eye!
ReplyDeleteI think it's great that you are making lots of projects using this material, Angela! If I could do that when I had left over material from the one project I bought it for, I could probably clear up my fabric stash a lot quicker! : )
ReplyDeleteDearest Angela,
ReplyDeleteThat is such a lovely cosmetics pouch! Smart for using the longer zipper for a good reason.
Enjoy what you're doing and wishing you a great day.
Love to you,
Mariette
Dear Angela
ReplyDeleteThank you so much for this wonderful tutorial!
I'm going to make one and pop it in my bag for my daughter when I go to France in June!
This fabric is gorgeous - very Marie Antoinette!
I LOVE the new birdie fabric you just bought too and can't wait to see what you do with that!
xox
Shane