Monday, March 26, 2012

Victorian Style Baby Dress

Today I finished this Victorian baby dress,
I didn't make one for a long time.
This one has a very lacy front panel, it was fun making 
this sweet dress.

You thought that I was using too much lace,
have a look at this picture...
I'm not using enough!
and at that time they made all the lace by hand,
they needed those nine month just to make a dress..


I still need to make a bib to complete the set.


I love the baby pouch the lady is holding.
an idea for my next one, with all the frills on the side.


Here is a short sleeve dress with a front panel.


How cute is this one..


One day I would like to make dress number three.
It looks like a nice dress and with the tie back, 
the baby could wear it for a long time.


I hope you have a lovely week.
xoxo

 I am joining in with  Knick of Time,
on Friday I am joining in with 

Wednesday, March 21, 2012

Silk and Lace Covered Moses Basket

Today I finished this Moses basket,
cream and beige is such a nice nice colour
for a baby bed.
I'm trying to finish all my orders so I can concentrate 
on making cushions and frilly things for the 
new shop that is selling my items.


The Moses basket is higher on the head side,
it shows in this picture.

I added some extra details on the curtain.


Layers upon layers of lace...
I use net under the silk skirt to make it stand out a bit.


It is easy to add blue or pink ribbons to the crown.


The blanket wasn't spared the lace explosion... 

Here the details of the stand.


My daughter Nadia was on transit in Amsterdam and
bought me my favorite magazine, 
it just came out, so I'm very lucky to have it.
She was on transit from Mexico, thanks God, she left just hours before
the earthquake.


Today I will join in with

I hope you come and visit.
xoxo


Saturday, March 17, 2012

Victorian Style Baby Bed


It took a few days but today I finished
this Victorian baby bed. 
I used silk and lots of lace..


I added some flowers to the curtain panel.


This is the first bed I made that can rock.
The bedding was easy to make, the curtain took me two days...


I hope you have a wonderful weekend.
xoxo

Today I will join in with,
         Feathered Nest Friday

Thursday, March 15, 2012

Spring Time

This is it? I bought these narcissus bulbs
last week and the paper said 'bridal crown'
so I expected something ... more!
The stems were growing longer and longer and 
then, these pretty mini flowers opened.
They do smell nice.


I love my Easter bunnies, they are from
Villeroy & Boch. I bought them on my last trip 
to Holland, they had a wonderful collection 
Easter decorations.


Yesterday I went into Pottery-barn and found 
this stand, I can use it for my ribbons,
so I had to have it ..


My cats love chewing grass, this keeps them away from
my plants and flowers.

The curtain I used for my pictures, belongs to a
new baby bed I am working on, I hope to finish it 
by tomorrow.


This mirror I bought at an auction in Holland.
Yes, I have a Klimt painting hanging on my wall,
I wish it was the real deal.


Still wishing...
I hope you have a wonderful weekend,
in Dubai weekend starts on Friday.
xoxo


Thursday, March 8, 2012

Makeup Bag Tutorial


This is a perfect little bag to keep your makeup in.
Again I used my new material, it is so versatile. 


Just a little lace and tassel will do.


Here I used a little more cotton lace.


I hope you can follow the step by step.
I think you could make it a bit bigger, maybe 
one centimeter all around.
You need pretty material for the outside
and cotton lined wading for the inside.


Here I used a zipper that is way too long, 
I use these on my baby pouches.
I do like to use longer zippers in my work
so my needle doesn't break when it hits the zipper's metal end.


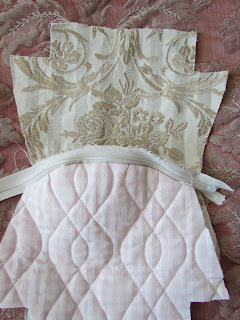
The first step is to zig-zag the zipper on one side of the bag.
I marked where I should start and end on both sides
of the zipper.
Then stitch the other side.


Now straight stitch the wading to the other side 
of the zipper, pin where the material starts and ends.


You can see the step a bit better in these pictures.


Repeat this with the other side.


                                        Now the zipper's ends are hidden between two layers  
                                                                         of material.


At this stage I decorated the front.
If I did it before, I wouldn't be able to get it 
exactly in the middle.


I pinned all the parts together and stitched them
 leaving the corners and an opening for turning
the bag inside out.


I left a ten centimeter opening free 
on the side where you can see the ruler
and cut the excess zipper ends.


Here I stitched all four corners closed.


I turned the bag inside out and ironed all the sides,
and closed the opening on the bottom by hand.


I am afraid you'll see a lot more projects
made until I'm cured of this 'new material'... 


I hope you have a lovely week.
xoxo

Today I'll be joining in with
and